
Chilaquiles is one of Mexico’s most iconic and beloved breakfast dishes, perfect for starting your day with a burst of flavor and energy. This traditional Mexican dish is a combination of crispy tortilla chips simmered in a rich, flavorful sauce, and topped with a variety of delicious garnishes like cheese, cream, onions, and avocado. Chilaquiles can be served with your choice of meats, or it can be made vegetarian, offering versatility and mouthwatering flavors.

Chilaquiles originated as a way to use up stale tortillas and transform them into a vibrant and filling meal. Over the years, this dish has evolved into a beloved comfort food enjoyed in many households and restaurants throughout Mexico. Whether you’re looking for a hearty breakfast or a satisfying brunch, this Mexican Chilaquiles Recipe will become a go-to favorite for many!
Ingredients
- For the Salsa:
- 4 medium tomatoes (or 2 large)
- 2-3 dried chilies (such as guajillo or ancho)
- 1 small onion, roughly chopped
- 2 cloves garlic, peeled
- 1/2 cup of water (for blending)
- Salt and pepper to taste
- For the Chilaquiles:
- 10-12 corn tortillas (stale or cut into triangles)
- 2 tablespoons vegetable oil (for frying)
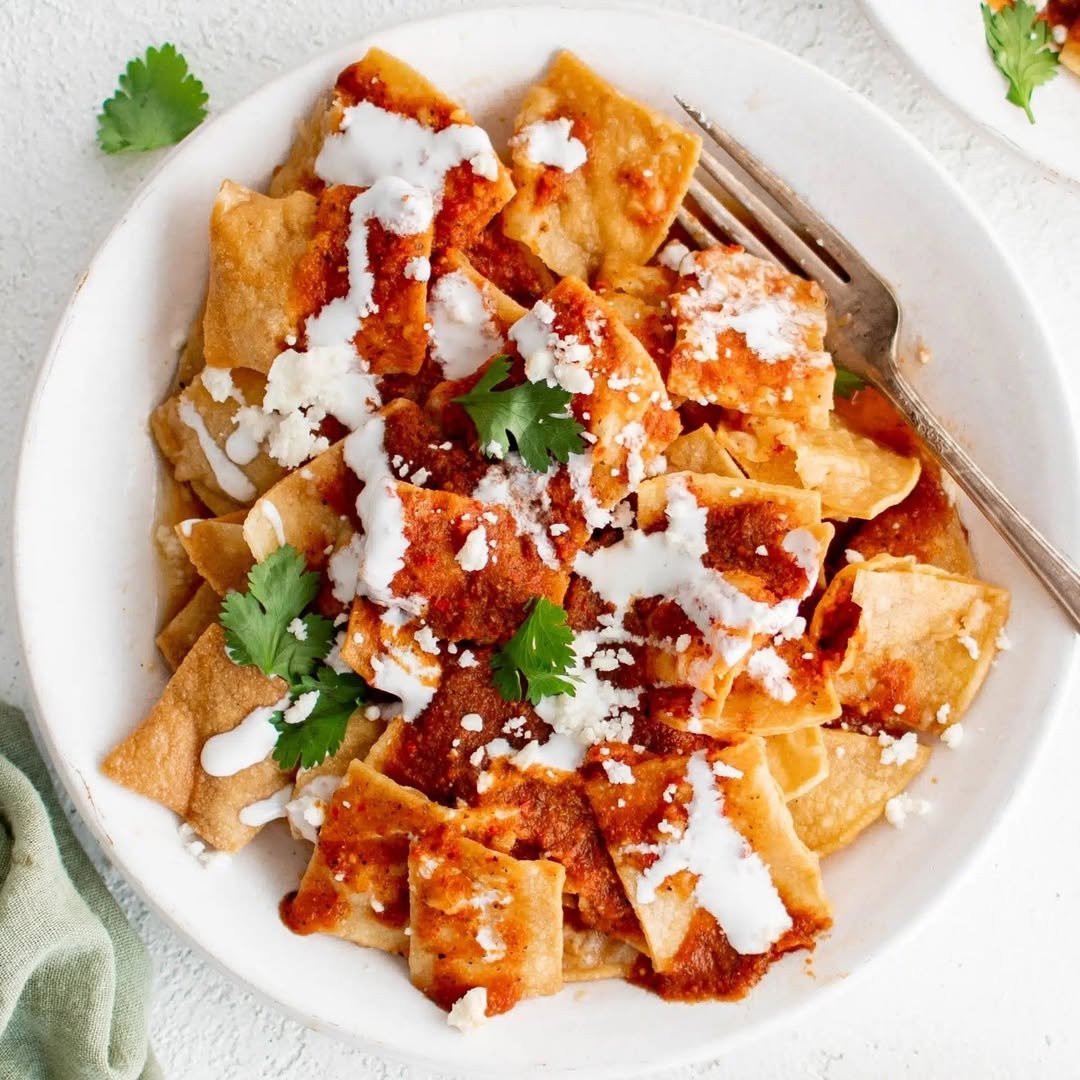
- 1 cup crumbled queso fresco or cotija cheese
- 1/2 cup sour cream or Mexican crema
- 1/2 small red onion, thinly sliced
- 1 ripe avocado, sliced
- Fresh cilantro for garnish
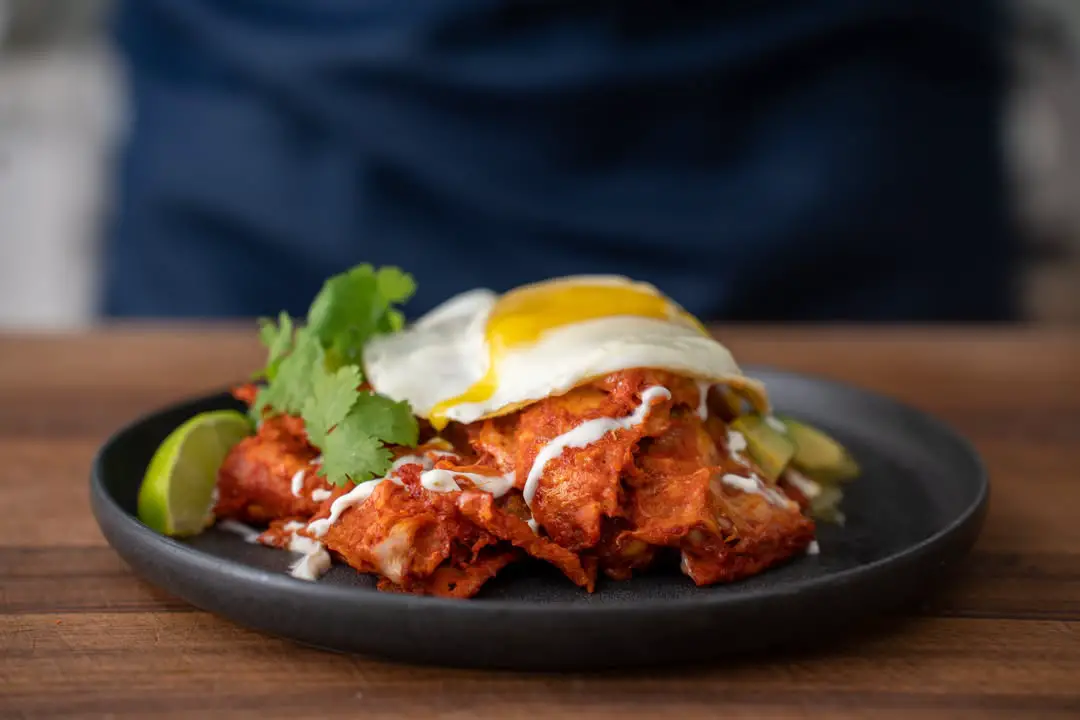
- Fried eggs (optional, for topping)
- Lime wedges for serving
Nutrition
A serving of chilaquiles can be a hearty and nutritious meal, offering a good balance of carbs, proteins, and fats. Below is an approximate breakdown for a single serving of chilaquiles (without eggs):
- Calories: 400-500 calories
- Carbohydrates: 45-55g
- Protein: 8-12g
- Fat: 18-22g
- Fiber: 5-7g
- Sodium: 350-450mg
Keep in mind that the nutritional content may vary depending on the toppings (like cheese, crema, and eggs) you choose. Adding proteins like eggs or shredded chicken will boost the protein content, making it more filling.
Prep Time
- Prep Time: 15 minutes
Active Time
- Active Time: 20 minutes
Resting Time
- Resting Time: None (Chilaquiles are best served right after preparation)
Cuisines
Mexican
Course
Breakfast or Brunch
Servings
This recipe yields 4 servings.
Calories
Approx. 450 calories per serving (without eggs or additional toppings).
Total Time
- Total Time: 35 minutes
Equipment
- Skillet or frying pan
- Blender or food processor
- Large serving plate
- Knife and cutting board
Instructions
Step 1: Prepare the Salsa
- Rehydrate the Chilies: Start by rehydrating the dried chilies. To do this, heat a pan over medium heat and lightly toast the chilies for about 1-2 minutes until they soften and release their aroma. Remove the stems and seeds, then soak the chilies in warm water for about 5-10 minutes to soften them fully.
- Blend the Salsa: Place the softened chilies, tomatoes, onion, and garlic into a blender or food processor. Add about 1/2 cup of water and blend until you achieve a smooth salsa consistency. Taste the salsa and add salt and pepper according to your preference.
Step 2: Fry the Tortilla Chips
- Fry the Tortillas: Cut the tortillas into triangles or strips. In a large skillet, heat the vegetable oil over medium heat. Fry the tortilla triangles in batches for 2-3 minutes, or until they turn golden and crispy. Once fried, place them on a paper towel-lined plate to drain excess oil.
Step 3: Combine the Salsa and Tortillas
- Simmer the Salsa: In the same skillet, pour the blended salsa and bring it to a simmer over medium heat. Allow it to cook for 5-7 minutes, stirring occasionally, so the flavors can meld together. Taste the salsa and adjust the seasoning as needed.
- Add Tortillas: Add the fried tortilla chips into the skillet with the simmering salsa. Stir gently to coat the chips evenly with the sauce. Let the chips cook in the salsa for another 2-3 minutes, so they soften slightly but retain some crunch.
Step 4: Assemble the Chilaquiles
- Garnish: Once the tortilla chips are coated in the salsa, transfer the chilaquiles to a serving plate. Top them with your choice of garnishes. Crumble the queso fresco or cotija cheese over the top, drizzle with sour cream or Mexican crema, and sprinkle with thinly sliced red onions and fresh cilantro.
- Optional Toppings: For an extra boost of flavor, add a fried egg on top of each serving, or add shredded chicken for a more substantial meal. Garnish with lime wedges for a refreshing tang.
- Serve and Enjoy: Chilaquiles are best served hot, straight from the pan, as a delicious and filling breakfast or brunch.
Tips for the Best Mexican Chilaquiles
- Choose the Right Tortillas: If possible, use slightly stale corn tortillas as they will hold up better when fried and absorbing the sauce. Fresh tortillas can become too soggy quickly.
- Customize the Sauce: You can use a red or green salsa based on your taste preferences. Red salsas tend to have a more earthy flavor, while green salsas are brighter and tangier.
- Adjust Spice Level: If you prefer spicier chilaquiles, you can add more dried chilies or a pinch of chili powder to the salsa. You can also include fresh chilies like jalapeños for an extra kick.
- Make It Veggie-Friendly: For a vegetarian version, simply skip the meat toppings and add additional veggies, like sautéed bell peppers or zucchini, for extra flavor.
- Serving Variations: Chilaquiles can be served with a variety of meats, including grilled chicken, shredded beef, or even a side of beans for extra protein.
Conclusion
This Mexican Chilaquiles Recipe is a delightful and flavorful dish that combines crispy tortilla chips with a rich salsa and a variety of delicious toppings. It’s versatile, customizable, and perfect for any occasion. Whether you’re craving a comforting breakfast or a satisfying brunch, chilaquiles will definitely hit the spot. Don’t forget to experiment with the different garnishes and protein options to make the dish truly your own!

I am Ashley Doyle, Senior Specialist in Food & Policy at The Humane Society of the United States and editor at airfryermama.com. I am passionate about transforming our global food system by promoting delicious, climate-friendly, plant-based foods. After transitioning from law to food and public policy, I now work with major food service companies to develop plant-based initiatives and animal welfare policies. My goal is to drive institutional change to combat climate change and improve our food system.